I’m excited to finally be able to show off a special project we’ve been working on with our friends at the Raspberry Pi Foundation for the past few months: a 3D Astro Pi emulator! Hundreds of thousands of students and teachers have used Trinket to run Python, Java, and HTML in their classrooms. Now, thanks to the Raspberry Pi Foundation, anyone can code a virtual 3D Astro Pi with Python. Check it out:
The Sense Hat is a simple device that attaches to the low-cost Raspberry Pi computer and allows easy physical computing – writing programs that interact with the real world.
If you’re not familiar with the Astro Pi project, you’re in for a treat. There are two Raspberry Pi computers (named Izzy and Ed) up on the International Space station and kids around the world submit code they’ve written for a chance to have it run in space! Ed has a Raspberry Pi camera module attached to him, and Izzy has a Sense Hat attached, letting students and event he astronauts themselves write programs to monitor the environment on the station, measure gravitational fields, and display information via the color LEDs. Learn more about Astro Pi here.
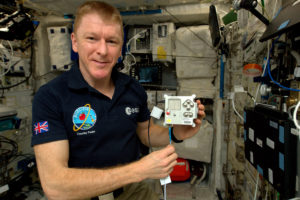
Here’s what Izzy, the Sense Hat Astro Pi looks like up in space with British ESA Astronaut Tim Peake:
We made the first version of the web-based Sense Hat emulator last year, using the power of our popular Python trinket. Since then, tens of thousands around the world have coded the Sense Hat virtually, and we’ve been thinking hard about how to make their experience even more powerful. The first version of the emulator let users program using the LEDs and environmental sensors. Astro Pi project manager Dave Honess had a more ambitious vision: he wanted anyone to be able to use the full power of the gyroscope, accelerometer, and compass in the Sense Hat, all from their web browsers. We love a challenge, and started work on the project in late January.
Note: If the embedded models in this post look flat to you, try Chrome, Safari, or Opera, browsers that fully support the 3D web. We made a special flat mode for browsers that can’t display 3D volumes, but you’ll have a lot more fun if you get the full experience.
The Challenge
There are several key challenges to building a virtual device that can sense motion:
- Displaying the device in three dimensions in a Web browser
- Letting users manipulate the device in 3 dimensions using a 2 dimensional interface
- Correctly displaying users’ manipulations on the 3D model
- Generating and updating the virtual readings in the device inertial measurement unit (IMU)
Meeting all of these challenges pushed our team, and the capabilities of the modern web, to their limits! We knew this would be a difficult project from the start but from 3D CSS transforms to Euler angles, the amount of knowledge we had to develop and deploy as a team truly surprised us. I hope to elaborate on each of these challenges in the coming weeks, but in this first post I’d like to focus on the first challenge only: making a 3D device. True to Raspberry Pi’s Maker roots, this will be somewhat of a tutorial, so you can follow along and hack on your own model if you like. And true to Trinket’s roots, all of my examples will be interactive HTML trinkets so you don’t even have to leave the page to get coding.
Let’s get started!
3D HTML & CSS
One of the things I try to convey early on to my students is that code isn’t discovered – it’s invented. This is equally true of things we tend to think of as creative products, like websites and apps, and things we tend to think of as not creative products at all, like the Web standards HTML and CSS. But those standards evolve as Web developers conceive of and advocate for cool new capabilities of these core standards. The 3D transformations that made both rendering our 3D models and rotating them possible are the result of many years of work by Web pioneers around the world.
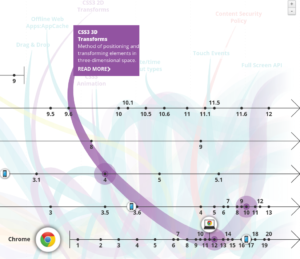
As more and more browsers have added support for 3D CSS transforms, it’s become a viable option for projects like ours. And it’s inspired Web developers like Julian Garnier to make awesome tools like Tridiv that make using the 3D web fun and easy. I discovered Tridiv during my research for this project and immediately thought it could be key to solving our first challenge.
We already had some basic rotation logic mocked up using Javascript. What’s more, we weren’t sure how our existing SVG-based LED rendering logic would play with 3D rendering. The first question to answer was this: could we hook up our rotation logic with a basic model. It’s nothing fancy, but here’s a quick 3D model I made in Tridiv in about 5 minutes with my Sense Hat and a ruler:
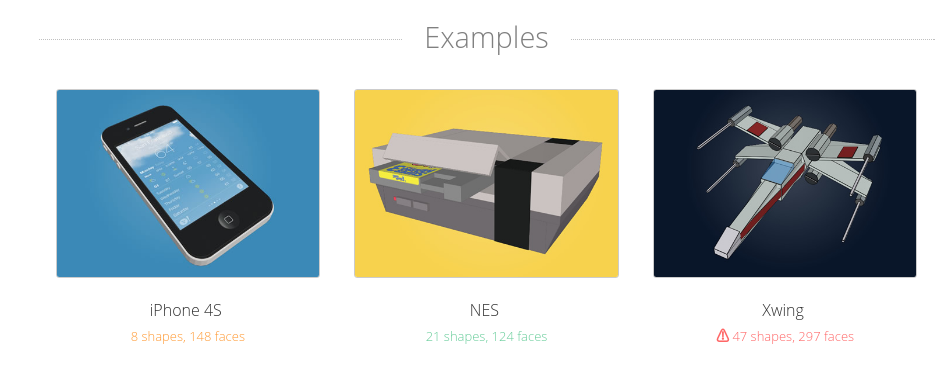
Proceeding step by step, we took this basic model and added our rotation controls to it. It worked! From there, we spent lots of time making the model more detailed:
As you can see, “more detailed” meant both adding more shapes and adding SVG textures to most of the model’s faces. The Raspberry Pi foundation provided SVG artwork and technical drawings that greatly simplified this process (thanks team!). You can also see the LEDs lighting up in the final model. Each pixel is a stack of red, green, and blue SVG elements and the colors you see are produced by varying their opacities, making the colors you see using additive color, just like the real device does with the three colored diodes in each pixel. Neat!
The next project requirement was that the model could be toggled from Sense HAT to Astro Pi and back again – a big part of the 3D modeling challenge! Like before, the first step was to get a basic Astro Pi model made to complete the switching logic. This one required a bit more complexity to represent the LEDs recessed in the unit’s face and the various buttons the stick up above the surface:
You can see the outlines of all the shapes that make up the model, though we hid the borders in the finished product. Admittedly, this first draft needed a lot of work to look like the real thing. Think you can do better? Here’s a live model on Tridiv that you can hack on yourself!
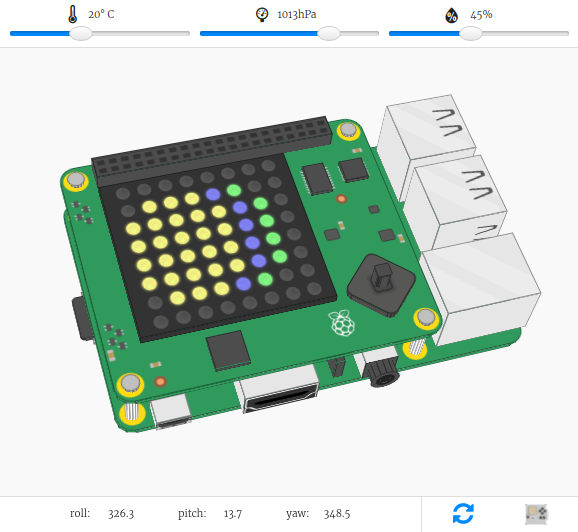
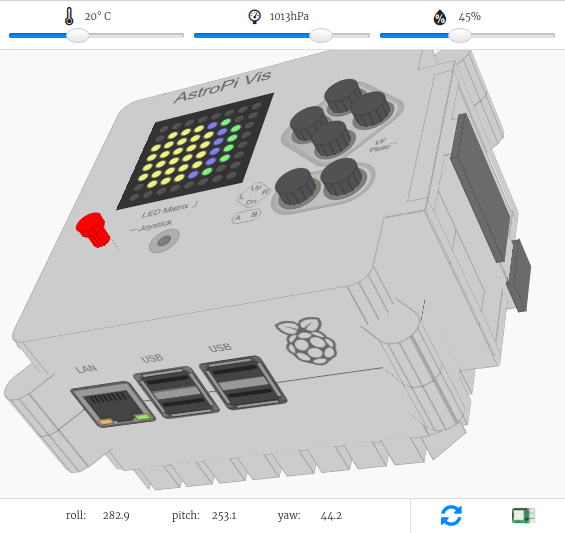
After integrating the proof of concept into the emulator to work out the bugs, we built a much more detailed Astro Pi model and put it into the file. Here’s the final Astro Pi model, complete with all the etchings the real case has, thanks to technical drawings the Raspberry Pi team provided us:
A major complexity of the project was getting the Sense HAT and Astro Pi models to show up only when they are needed, so that they wouldn’t slow down the hundreds of thousands of Trinkets that don’t need them. We use the open-source Skulpt Python interpreter, and had to build a custom method of determining whether the sense_hat module had been imported to know whether to load the module. In addition, we had to store the model’s orientation and whether the Astro Pi or Sense HAT enclosure was selected, so that shared trinkets could preserve these properties. I hope to dive into more of the tech behind our new emulator in future posts. For now, happy hacking!
The Final Piece: You
The most important piece of any software project is its users – that’s you! If you’d like a hand getting started learning what the Sense Hat can do, the Raspberry Pi foundation has tons of free resources available. This Sparkles project is a great place to get started with the Sense Hat (and has several 3D trinkets embedded right in it!).
Looking for other ways to hack on the Sense Hat? There’s also a desktop emulator you can run on your Raspberry Pi! Read more here. And, of course, you can pick up the hardware itself in the Raspberry Pi store.
Got a project to show off? Tweet the link your trinket to @trinketapp and @Raspberry_Pi for a chance to get featured!
A huge thanks to Dave, Rik, Tracy, and the rest of the Raspberry Pi / Code Club team! Dave Jones and a whole host of other developers provided helpful code and examples. And of course, my Trinket teammates Brian, Michael, and Albert Jan were crucial to getting everything you see in the emulator, and quite a lot you don’t to work. We seriously had the most awesome team and community on this project you could imagine.
One thought on “How to Make a 3D Astro Pi”
Comments are closed.